 Detune
How to Make Beats on GarageBand
Set a tempo, open the Beat Sequencer, tap in a kick, snare and hi-hat, then add bass, chords and an arrangement. Real settings, on iPhone and Mac.
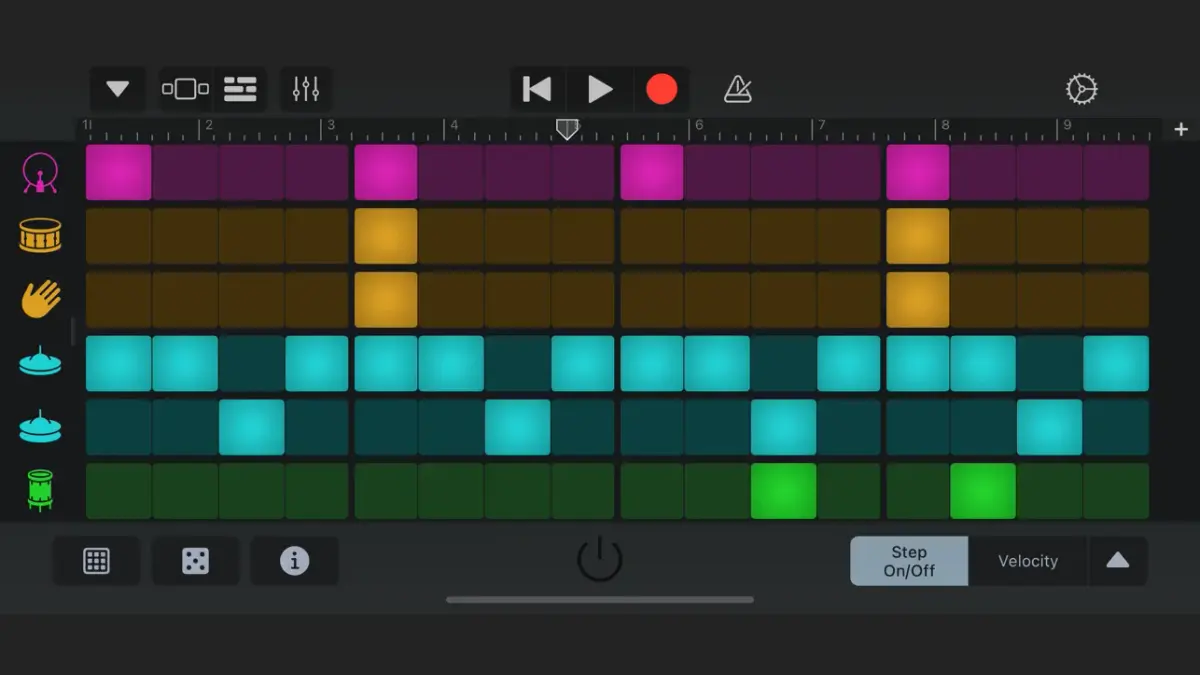
Open a new project, set your tempo, load a drum kit or the Beat Sequencer, and tap in a kick, snare and hi-hat pattern. That is a beat. Everything after is arrangement and sound. This page walks through the whole thing on an iPhone, with the actual BPM figures, kit names and step positions, then covers the bassline, a chord part, an arrangement, and the point where GarageBand’s presets stop helping.
Start a project and set the tempo
Tap the plus button to make a new song, then open the song settings and tap Tempo. Set it before you play a note, because every instrument you record from then on follows it, and changing it later shifts everything you have played.
Apple’s guide gives two ways to set it: tap the tempo bar repeatedly in time, or tap the up and down arrows next to the number. The arrows are the one to use, because you already know the number you want. The number depends on the genre:
| Genre | Tempo |
|---|---|
| Lo-fi hip-hop | 70 to 85 BPM |
| Boom bap | 85 to 95 BPM |
| Trap | 130 to 150 BPM, with the snare on beat 3 so it feels half as fast |
| House | 120 to 128 BPM |
| Techno | 128 to 135 BPM |
| Drum and bass | 170 to 176 BPM |
Pick 90 for the walkthrough below. It sits in the middle, and a mistake at 90 is easy to hear.
While the settings are open, tap Key Signature and choose a key and a scale. A minor is the easy choice: every white note belongs to it, which matters in a minute when you get to the bass. On a Mac, the tempo and key are in the display at the top of the window. Click and drag the number or type one in.
Programme a drum pattern
Tap the Browser button, swipe to Drums, and tap Beat Sequencer. You get a grid. Each row is one piece of the drum kit and each column is one step. Tap a square to turn that drum on for that step. That is the entire mechanism.
The grid opens at sixteen steps, and at the default step length of a sixteenth note that is exactly one bar of four beats. Step 1 is beat one, step 5 is beat two, step 9 is beat three and step 13 is beat four. Everything in between is an offbeat. Hold that map in your head and you can build any drum pattern you have ever heard.
Here is a hip-hop pattern at 90 BPM. Pick an electronic kit first: tap the Navigation button, tap Sounds, and choose one. Apple’s own Beat Sequencer guide names Trap Door and Hacienda as examples, and Trap Door is the one to start with for anything with an 808 in it.
Kick on steps 1, 8 and 11. Snare on steps 5 and 13. Closed hi-hat on every odd step, so 1, 3, 5, 7, 9, 11, 13 and 15. Press play. That is a beat, and it is recognisably a beat because the snare lands on beats two and four and the kick does not, which is the backbone of almost everything with a backbeat. The kick on step 8 is the part that makes it swing rather than march: it falls a sixteenth before beat three instead of on it.
Three more controls turn that from a loop into a groove. Tap the Step Settings button and choose Velocity, then drag down on the hi-hats at steps 3, 7, 11 and 15 so the offbeat hats are quieter than the ones on the beat. Your ear reads the alternating loud and soft as a pulse. Choose Note Repeat and drag up on the hat at step 15 to slice it into a short roll into the next bar. This is the trap hi-hat sound, and it is one drag. Choose Chance and lower it on one of the kicks so it does not play every time round, which stops the loop sounding like a loop.
Two facts from Apple’s guide before you go further. The pattern can be between 16 and 64 steps in 4/4, set from the Inspector under Length, so a two-bar pattern is 32 steps. And the step length can be 1/8, 1/16 or 1/32, with triplet versions. Sixteenths is the right default. Thirty-seconds is for hat rolls you want to draw by hand.
To get the pattern into the song, tap Record. The sequencer starts by itself and the pattern loops until you stop. Anything you switch on or off while it runs is recorded as part of the take, so you can add the second kick on bar three and it will be there.
If you want acoustic drums instead, Drummer is the other route. It is a virtual player rather than a grid: choose a drummer from the Acoustic, Electronic or Percussion lists, then drag the puck on the XY pad, up for louder, right for busier. It gets you a convincing performance in a minute. It does not teach you where the kick goes, which is why the sequencer comes first here.
Add a bassline
Go back to the browser and choose Bass. Switch from Chord Strips to Notes view, tap the Scale button and pick Minor. The fretboard now shows only the notes in A minor as bars, so every note you can tap is a right note. The rest is rhythm.
The simplest bassline that works is the root note of the key on every kick. Record a bar of A on steps 1, 8 and 11, matching the kick exactly. Because the bass and the kick move together, the low end sounds like one instrument rather than two fighting. That is the sound of most hip-hop and most house, and it is a good default until you have a reason to leave it.
Once that sits, give it somewhere to go. Play A for three bars and drop to G, one note down the scale, for the fourth. The change on bar four is what tells the listener the loop has a shape. If you want to know why those two notes work together, the chord and progression section of Music Theory for Producers covers it in about five minutes.
GarageBand also offers Autoplay for the bass, a knob under Controls that plays a pattern for you when you tap a chord strip. It is fine for a sketch. It is also the fastest way to end up with a bassline that sounds like every other GarageBand bassline, so once the first pattern is in, switch it off and play the notes yourself.
Add a melody or a chord part
Choose Keyboard from the browser. The default sound is a piano. Start with the sounds under the Alchemy synth heading instead, because those come with the controls you will want in the last section. Tap the Scale button again and pick Minor, and the keyboard becomes bars like the bass did.
For chords, tap the Chord Strips button. The strips are the chords of the key you set in the song settings, and tapping one plays it. Am, F, C, G is a progression that works over the bassline above: one chord per bar, and the bass drops to G exactly when the chord does. If you want something to move on top of the chords without playing a melody, hold a chord strip and turn on the Arpeggiator: tap the Arpeggiator button, tap Run, and set Note Rate to 1/16 and Octave Range to 2. What Is an Arpeggiator explains what each of those settings does.
For a melody, the minor pentatonic is the safe set: in A minor, that is A, C, D, E and G. Nothing in it clashes with any chord in the key. Record a short phrase over bars one and two, leave bars three and four empty, and let the bass change on bar four do the work. Space is what makes a two-bar melody sound intentional rather than accidental.
Arrange it into something that goes somewhere
A beat is a loop. A track is a loop with a plan. Tap the Tracks button to see everything you have recorded stacked as regions, and use song sections, the button at the right end of the ruler, to duplicate the section until you have four or five copies.
Then take things away. Section one is drums only. Section two adds the bass. Section three adds the chords and the melody, and is the part everyone hears as the beat. Section four drops the kick and the bass for four bars, then section five brings them back. That is an intro, a build, a hook, a breakdown and a drop, and you made it by deleting regions from copies of the same eight bars. Nothing new was recorded.
Two minutes is a reasonable first target. At 90 BPM that is 45 bars, or five sections of eight bars plus a bar of tail.
Make it sound like yours, not like the preset
Every GarageBand instrument is a synth with a preset loaded, and the preset is what everyone else’s GarageBand beat also sounds like. More presets will not get you out. The four or five controls the preset is made of will.
The Bass instrument’s sounds are fixed, so add a Keyboard track instead and pick a synth bass from the Alchemy synth list. Alchemy sounds show extra parameter knobs and an XY pad, and Apple’s guide notes you can tap the arrows to reach more of them. Find the filter cutoff and turn it down until the bass is dull, then bring it back up until you can just hear the edge of the note. Then find resonance and add a little. The bass is now yours, in the sense that nobody else’s cutoff is at that exact point. Do the same with attack on the chord sound: a slow attack turns a stab into a pad without changing a note.
That is where GarageBand stops as a beat-making tool. It has every sound you need to make a beat that works. It does not explain what a cutoff or an envelope does, so the sounds either stay as shipped or get changed by guessing. Learning what those controls do is a separate skill, and it is the skill that decides whether the beat sounds like a GarageBand beat or like you.
GarageBand on iPhone vs Mac
The Beat Sequencer is on iPhone and iPad only. The Mac version has no step grid for drums; it has Drummer and a piano roll. Apple’s Mac guide lists Drummer genres as Rock, Alternative, Songwriter, R&B, Electronic, Hip Hop and Percussion, and each drummer has the same loud-to-soft and simple-to-complex pad as the phone.
The Mac has more room for the parts after the drums. You can quantise a recording in the piano roll, draw notes in by hand, and edit velocities one note at a time. The phone has fewer editing tools and a better way to start. Songs made on the phone open on the Mac, so the practical split is to sketch the beat on the phone with the sequencer and finish it on the Mac if you have one. If you do not, the phone is enough for everything on this page.
Common questions
Can you make beats in GarageBand?
Yes. GarageBand has a step sequencer for drums, a bass and a keyboard with the scale locked to the key, a virtual drummer, and enough arrangement tools to build a finished track. It is free on every iPhone, iPad and Mac.
Is GarageBand good for beat making?
For learning and for a first hundred beats, yes. The Beat Sequencer has a pattern playing in under a minute, and the Scale button removes wrong notes from the bass and keyboard. Its limits are the stock sounds, which are recognisable, and the shallow editing on the phone. When you outgrow it, Logic Pro opens GarageBand projects directly.
How do you put beats into GarageBand?
To import a beat you already have, drag an audio file into the Tracks view from the Files app, or use the Loop Browser, which ships with a library of Apple Loops in every genre. To make one, follow the sequencer steps above.
How do you make beats step by step?
Set the tempo, programme the drums, add a bass that follows the kick, add a chord or melody part in the same key, duplicate the loop into sections and remove parts to give it a shape, then adjust the sounds. In that order. Sound last, because a good pattern with a preset sound is a beat and a great sound with no pattern is not.
The drums, bass and chords above take about half an hour the first time. The part that takes longer is the last section, because it is not a GarageBand skill. It is a synth skill, and GarageBand happens to be full of synths.